Receiving webhooks with Otto
FileMaker applications need to receive webhooks from other applications. This can be done with the FileMaker Data API or with other applications like Claris Connect, or Zapier. Otto makes this easy to do without having to set up another service, or handle the FileMaker Data API’s authentication yourself. It also works well with Claris Connect or Zapier.
This feature requires a full license of Otto.
Otto Receiver
The Otto Receiver receives webhooks (and Pub/Sub messages) and does the following:
- Creates a record in a Table specified by the OttoReceiver Layout (see below)
- Populates two fields,
PayloadandChannel - Calls the
OttoReceiverscript
Otto deposits the data being posted in the Payload field in the new record. We create a new record instead of just passing the script parameters because it can handle larger payloads and is easier to debug.
The Channel field is populated with the :channel part of the url so that your OttoReceiver script can handle different webhook "channels." See below for more info on how to construct the URL for a channel.
You do not need to configure different webhooks ahead of time. Otto will take the URL of the webhook and parse it into Channels. You can use the Channel to conditionally process each webhook. We call them Channels because the SimpleQ module lets you "subscribe" or listen for webhooks and messages on a channel. See below for how to use channels in your webhook url.
Steps
Here are the steps you will need to follow to use Otto Receiver:
- Turn on Proxy
- Get an API Key
- Prepare the FileMaker database
- Send a Post Request to the Otto Endpoint
Proxy
The Otto Receiver uses the Otto Proxy. You will need to enable the proxy to use Otto Receiver. You will also need to get an API Key. You will use this API Key to authenticate your webhook request.
Using with SimpleQ (Optional)
SimpleQ is FileMaker file that implements a message queue for FileMaker. It has built-in support for Otto's webhook receiving API. SimpleQ comes preconfigured with all the elements required by Otto listed below. Using SimpleQ is optional, but we encourage you to check it out.
Preparing the FileMaker Database
In the database that will receive webhooks, you will need to add a few FileMaker elements to your database.
Required elements
You'll need to add these to your database:
- A Layout called
OttoReceiver- The layout should have two text fields on it, one called
Payloadand one calledChannel. It does not matter what the underlying table is called. - Otto will create a record in the table for every webhook it receives.
- It will populate the
Payloadfield with whatever was posted to the webhook as JSON. - It will populate the
Channelfield with the channel that the webhook was sent to. (see below)
- The layout should have two text fields on it, one called
- A Script called
OttoReceiver- This script will be run when a webhook is received. It will be run in the context of the OttoReceiver layout.
- It will also receive a script parameter as a JSON string, containing the query parameters that were passed with the webhook.
- You can use this script to do whatever you want with the payload. Typically your script will branch based on the value in the channel field, and write the data to whatever FileMaker data tables it needs to. You can write this script to do whatever you would like with the data in the payload.
- The Otto Receiver log will show an error if this script does not exist.
The names of the elements above should be exactly as shown. If they are different, Otto Receiver will not work.
Authentication
You can use the ApiKey in the following ways to authenticate your request.
Bearer Token Header
Authorization: Bearer <api-key>
Basic Auth
POST https://apiKey:<api-key>@<otto-server-url>:3030/receiver/:db/:channel
When using basic auth the part before the ":" is "apiKey" and the part after is your API key that you got from the Otto server.
Query parameter
add apiKey=[your-api-key] to the url.
POST https://<otto-server-url>:3030/receiver/:db/:channel?apiKey= <your-api-key>
Send a POST request to Otto Receiver
Send a Post request to the endpoint below
POST https://<otto-server-url>:3030/receiver/:db/:channel
:dbis the name of the database that will receive the webhook.:channelwill go into the Channel field. You can use this to process different payloads differently
Accepted content types
The data you post needs to be in one of these two content types:
application/jsonapplication/x-www-form-urlencodedtext/plainmultipart/form-data- Text only! See next section for posting files.
Response
Status code 200 indicates success. This is the structure of the response that gets sent back to the caller.
Response
{
  "success": true,
  "scriptError": 0,
  "scriptResult": {
    "success": true
  },
  "messageRecordId": "313",
  "successMessage": "Message Accepted"
}
Modifying the Response
In most cases you won't need to change the response that Otto sends back to the application that sent the webhook. Normally the calling applications only care about a 200 response, or even just a response that begins with '2'. But occasionally you will need to send a specific response back. MSGraph, for example, requires that, for one of the calls, it gets back a 202 response. In these cases, you can modify the webhook response using JavaScript.
If you place a Javascript file in /<OttoPath>/config/extensions/webhookResponseModifier.js modelled after the one below, the function will be called before the webhooks call gets sent back to the caller.
The below function will modify the response of any webhook calling the MSGRAPH channel.
module.exports = (data, payload, channel, query) => {
  if (channel === "MSGRAPH") {
    return {
      status: 202,
      contentType: "text/plain",
      body: query.validationToken
    };
  }

  return false;
};
The function must return an object with status, contentType, and body properties if you want to adjust the response. If you want to use Otto’s defaults, have the function return false.
Any time you change anything in the extensions folder you will have to restart Otto for your changes to take effect.
Posting files
If you want to send files to Otto Receiver, you will need to use a slightly different URL. Parsing and handling files is intensive and it is best to use this route instead.
POST https://<otto-server-url>:3030/filereceiver/:db/:channel
Files are uploaded to the FileMaker server's document directory. The path will be:
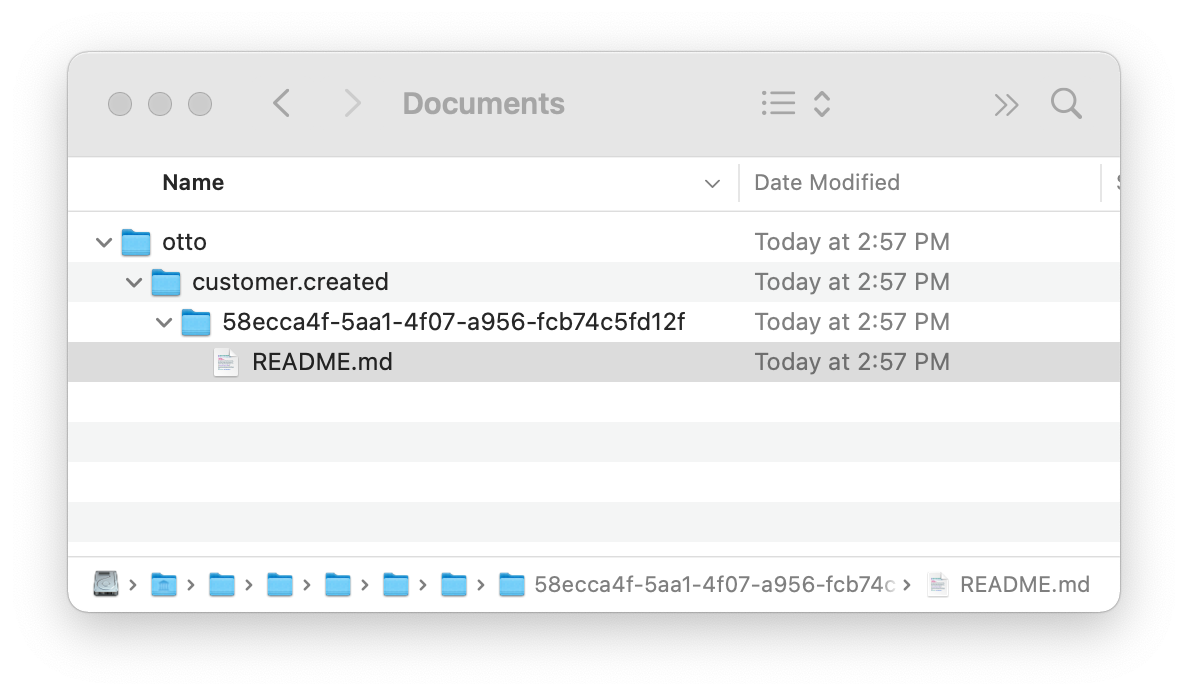
fms-server-path/Data/Documents/otto/:channel/:uuid/filename.png
The image below shows a README.md file that was uploaded by Posting multipart/form-data to
:3030/filereceiver/contact.fmp12/customer.created
The file path and other file information is added to Payload as a uploaded_files array. When you are processing that message you can use this information to import the files into a container field using a script.
File info added to payload
The uploaded_files array is added to the payload when files are uploaded.
{
  "otherFields" : "posted"
  "uploaded_files": [
    {
      "destination": "/Volumes/Macintosh HD/Library/FileMaker Server/Data/Documents/otto/customer.created/9c3fedfb-ecf7-434d-8a61-041b705b5b28",
      "encoding": "7bit",
      "fieldname": "aFile",
      "filename": "README.md",
      "mimetype": "text/markdown",
      "originalname": "README.md",
      "path": "/Volumes/Macintosh HD/Library/FileMaker Server/Data/Documents/otto/customer.created/9c3fedfb-ecf7-434d-8a61-041b705b5b28/README.md",
      "size": 40
    }
  ]
}